|
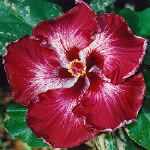
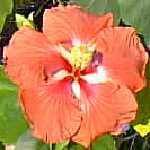
Introduction New varieties (cultivars) of hibiscus are created by getting them to produce seed. This is called "hybridizing." Unless the plant is a true hibiscus species, seed produced by a plant using its own pollen will likely produce seedlings that differ from its parent(s) in subtle to major ways. The color and form of the bloom could be different, the leaves, growth habit and other characteristics will also likely be different. Most commonly, two different varieties are selected to produce seed. Using different looking varieties for the pod parent (mother) and for the pollen parent (father) will result in seedlings that have a wider range of traits. Some will more closely resemble the mother, some the father and some will be somewhere in the middle. Traits from a grandparent or a distant ancestor may emerge. Each seed will produce a genetically different plant with its own set of characteristics. To many hibiscus enthusiasts, the thrill of developing new and exciting varieties in new colors and combinations of colors is what makes their tropical hibiscus hobby so much fun! Selective breeding, choosing the parents to produce a certain color or type of bloom, finding both parents available on the same day, actually getting a pod with seeds and raising the resulting seedlings to maturity so they can bloom, can be both challenging and fun.
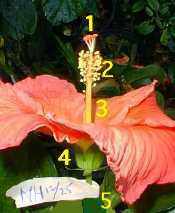
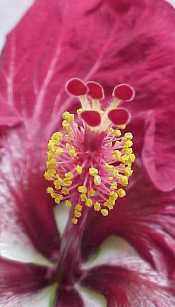
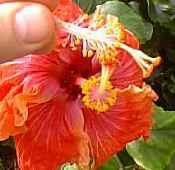
Pollination Your best chance of getting hibiscus seed requires fresh pollen, that gold powdery substance, and fresh, receptive stigma pads that will allow that pollen to fertilize the ovules within the ovary at the base of the bloom. When this happens, conception may occur. The ideal conditions are 60-80F degrees and high humidity -- conditions that are generally ideal for tropical hibiscus to be happy. Some hybridizers have had success late in the afternoon and some when temperatures were in the mid-90s. Still, working early in the morning when the pollen has just been released by the pollen sacs and when the pads are fresh on a newly opened flower seems to increase the rate of success. It's a good idea to turn a bloom that has just been pollinated away from the sun to keep the pads (and pollen) from drying out. That pollen needs time to make the connection to the ovary at the base of the bloom. High humidity slows the drying of the pollen and the pads. Some varieties produce little pollen and some pollen may be more potent than other pollen. Some varieties are very reluctant or will consistently refuse to produce seed pods -- even under ideal conditions. Transferring pollen to the pads can be done in different ways. Some hybridizers use tweezers or surgical forceps to remove the pollen sacs from the style. Some use a soft brush to remove the pollen and apply to the pads. Others simply snap off the style or pick the entire bloom and walk around looking for a suitable mother (pod parent), but, of course, that bloom is no longer a candidate for motherhood. After the pollen has been applied, it's wise to carefully wrap some sort of label around the stem of the flower with the identity of the pollen parent, the date of pollnation, etc. The pollinated bloom must stay on the plant for the seed pod to form and develop to maturity. Think of the seed pod as a fruit because that's exactly what it is. In the example shown, pollen from Magician's Hat (MH) was used on a 12/25 bloom.
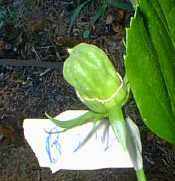
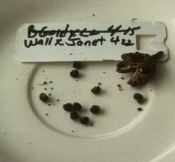
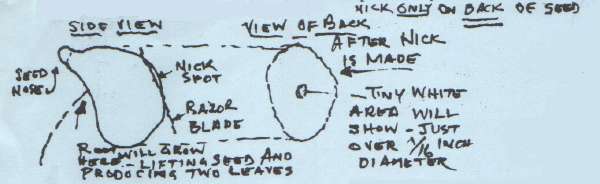
The Seed Pod Develops If you have been successful, the bloom will fall away in a day or two leaving behind the stem and base of the flower. The ovary in the base will swell over the next few weeks forming a pod the size of the end of your thumb. Depending on growing conditions like temperature, light and plant habit, the pod will ripen, turn brown and open in 6-14 weeks exposing fuzzy brown to black seeds about the size of apple seeds. Watch the pod carefully because a ripe pod can begin to turn brown and open within 24 hours and the seeds can spill out and be lost. The pod could contain anywhere between zero and 60 seeds, but 10 to 20 is common. Once the seeds have been harvested and the parentage, dates and other information have been recorded, some hybridizers will plant immediately. Others will put in envelopes in sealed jars. Some will store in the refrigerator for weeks or months -- making sure there's no moisture for fungus to grow in. Yet others will store in envelopes at room temperature in a dry place. If seeds have been allowed to dry, most hybridizers prefer to soak them overnight and carefully nick the black seed skin on the back of the seed with a razor blade.
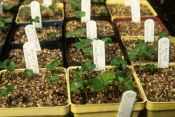
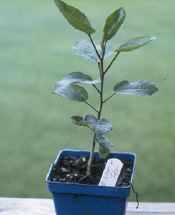
Planting the Seeds Seeds can be planted in a commercial seed starting medium or a mix can be made out of some combination of sand, perlite, vermiculite and Canadian peat. The seeds are planted 1/4 to 1/2" deep in the mixture and should germinate in a week to a month on average. It is best to keep the temperature about 80 to 85° F (about 28° C) and the medium moist, but not soggy. A heat mat to provide bottom heat is helpful. Until you have found out what works best for you, the seed starting kits that are available in gardening stores and catalogs that use small plastic cells may be the best way to start -- one seed per cell.. Some have used styrofoam coffee cups with drainage holes poked in the bottoms and 100% perlite to start their seedlings. Some plant several seeds in 4" pots. Putting the pots/cups, etc. in trays with clear domes and starting under lights can give them a headstart. It is absolutely essential that you do not use too much water. Seeds will rot and will not germinate if they stay in a wet/soggy medium. After the seedlings have developed several sets of true leaves and the stems have begun to harden and become woody, they may be moved to a larger pot. A water soluble 20-20-20 fertilizer can be used per label directions at this point. Some growers will move these 3 or 4" tall seedlings to a gallon plastic pot containing potting soil, others will move their seedlings up in several stages to gallon pots and use soilless mixtures. Some growers plant their young seedlings in the ground in their own bed. (Always avoid disrupting the plant and its roots as much as possible in these moves.) These small seedlings should be gradually introduced to sun over several days. Remember they are tender, so avoid temperatures in the 40s.
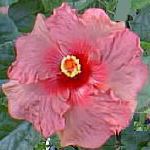
Blooming and Evaluation Eventually, after anywhere from 6 to 24 months (depending on temperatures and how you treat them, etc.), your seedlings will begin to bloom and the evaluation will begin. When you see that first bloom on that new seedling, you are seeing the very first flower from that unique combination of genes and that can be thrilling! It may be difficult to objectively evaluate your own "children." Are they sufficiently different from their parents? Are they an improvement over similar varieties? Are there faults in bloom or bush that suggest the compost pile should be next? This is all part of the fun. Out of 100 seedlings, only 4 or 5 may be worth keeping when compared against existing varieties (cultivars) If the seedlings meet the criteria, you may want to name, register and show the them in competition. Only a very small percentage get this far, but it can be a very rewarding personal experience!
|
||||||||||||||||||||||
 |
||||||||||||||||||||||
|
||||||||||||||||||||||
|
||||||||||||||||||||||